
Guides & videos
Observations — the field notebook
In a nutshell: an observation is your notebook for a round or a day in a domain. You open it once, then file in it everything you do along the way: photographs, dictated notes, measured trees, surveyed plots.
It is the heart of the app.
The screen
Three areas, from top to bottom:
- The Domain banner — your working context.
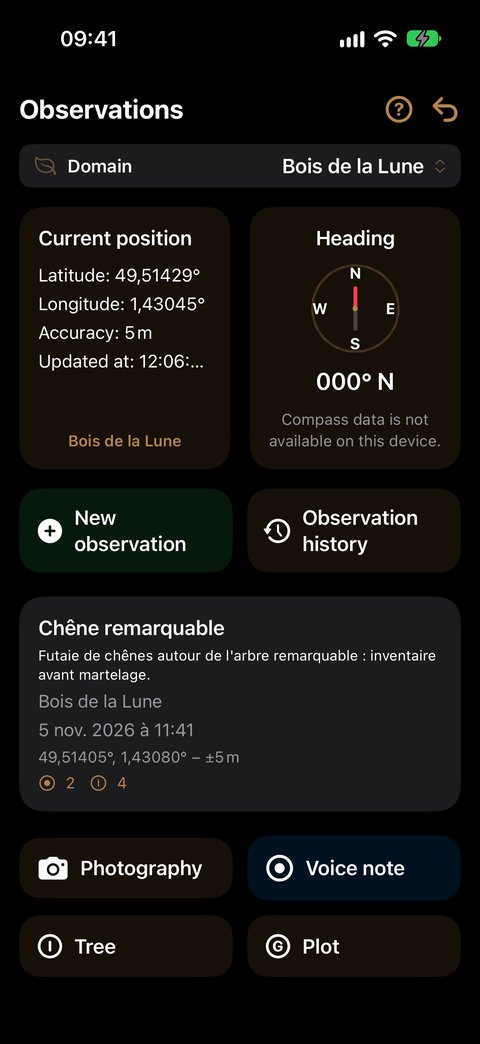
- A dashboard: on the left your Current position (latitude, longitude, altitude, accuracy), on the right your Heading. Below the position, the app shows the domain it recognises at this spot — tap it to make it active in one gesture. Outside any domain, it shows "No domain at this location".
- The actions: New observation and Observation history, then the card of the current observation (title, description, domain, date, position and the number of items recorded), and below it the four enrichment actions.
Creating an observation
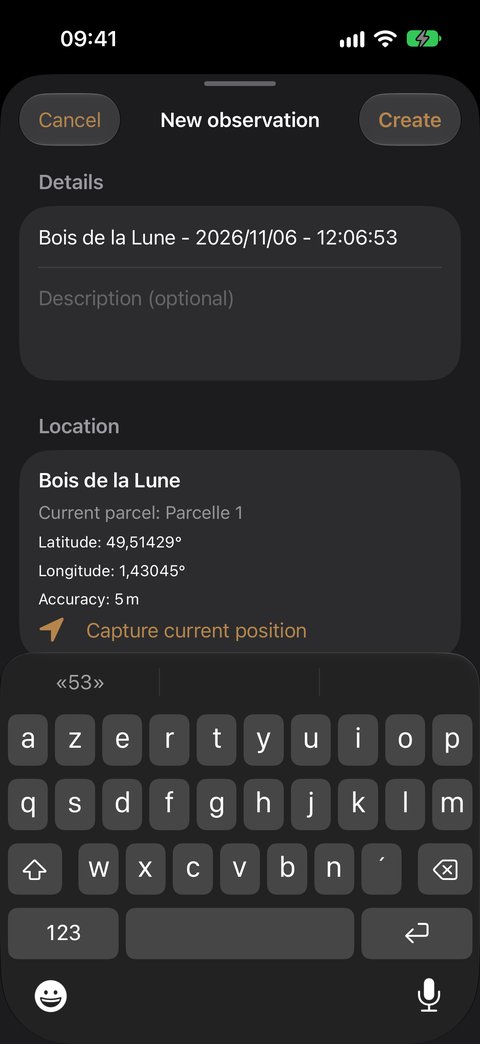
- Go into the field, in the domain you are working in.
- Check that the banner shows this domain. If not, tap the domain recognised below your position: the banner falls into line.
- Tap New observation.
- The Title is already filled in and selected: domain name, date and time. Keep it, or type your own — it immediately replaces the suggested title.
- If you wish, add a Description (optional): the purpose of the round, the work site, the weather…
- Under Location, the app reminds you of the domain, the parcel you are in ("Current parcel") and your coordinates. Capture current position takes the measurement again if the GPS has just improved.
- Tap Create.
The new observation becomes the current observation: all actions apply to it.
Creating an observation costs no credit.
Enriching the current observation
All actions apply to the observation displayed in the current observation card. To switch observation, go through Observation history. Choose what you want to do: each action has its own detailed guide, illustrated screen by screen.
The credit count is detailed on the Credits page.
The detail of an observation
Tap the current observation card — or an observation in Observation history — to open it full screen. A Map / List selector at the top of the screen switches between two views. The observation opens on the Map as soon as one of its items has a location, on the List otherwise. The ↩ arrow at the top right brings you back to the Observations screen.
The Map view
Each item with a location is placed on it: photos, videos, voice notes, trees, plots. The point of creation is marked Start, and a line links the items in the order you recorded them: you can read your round back.
- Wide view: one coloured dot per item. When you zoom in, each takes its symbol — camera, video camera, microphone, tree, "G" for a plot.
- Background: Standard or Satellite.
- At the bottom right, Show plots draws the domain's parcels; Show grid appears if one of them carries a grid. Showing or hiding a layer does not change your framing.
- Tap an item to open it: the photo's comment, the video preview, the voice note's transcription, the tree's record or the plot summary.
- A banner flags the items without a location ("… item(s) without a location — see the list"): they only appear in the List view.
The List view
From top to bottom:
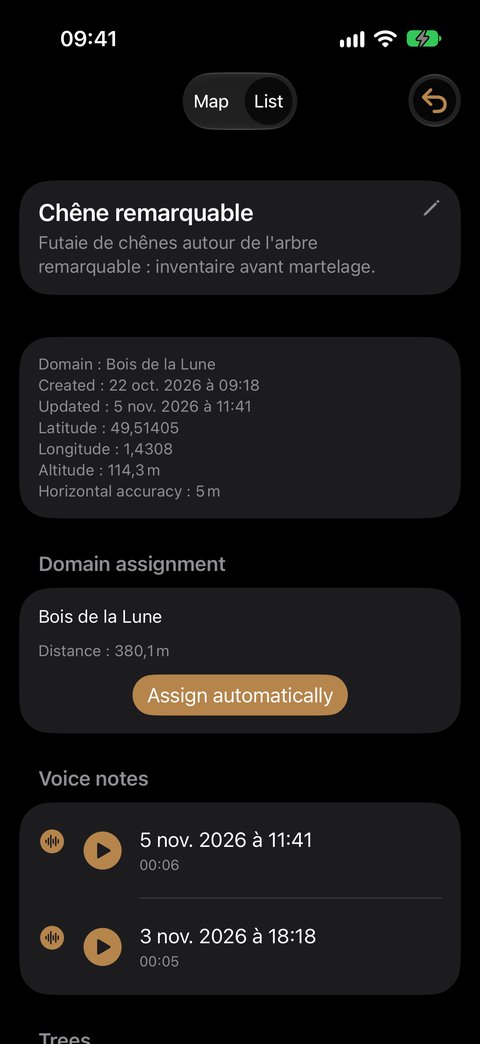
- The title and the description: tap them to edit them.
- The information: domain, creation and update dates, coordinates, altitude, accuracy.
- Domain assignment (see below).
- The items collected, grouped by kind — Photographs, Videos, Voice notes — each row showing its date and time. Empty sections are not shown.
- Trees: one row per tree measured in this observation, with its number, its species and its latest diameter. A tap opens its record.
- Plot: one row per survey. A tap opens its summary.
- Notes.
To remove a photo, a video or a voice note, swipe its row to the left and tap Delete.
Assignment: the domain for the observation, the parcel for each measurement
The observation is attached to its domain, and to it alone: a round can cross the whole domain. The Domain assignment section of the List view shows this domain and its distance from the observation.
The Assign automatically button recalculates the domain from the position where the observation was created: the drawn parcel that contains it, failing that the nearest domain within the limit of the Indexing precision.
The measurements, for their part, each keep their parcel — the one where you measured the tree or surveyed the plot. It is the parcel that files the measurement in Analysis and in your exports. You have nothing to do: it is fixed at the moment of the measurement.
Finding your observations
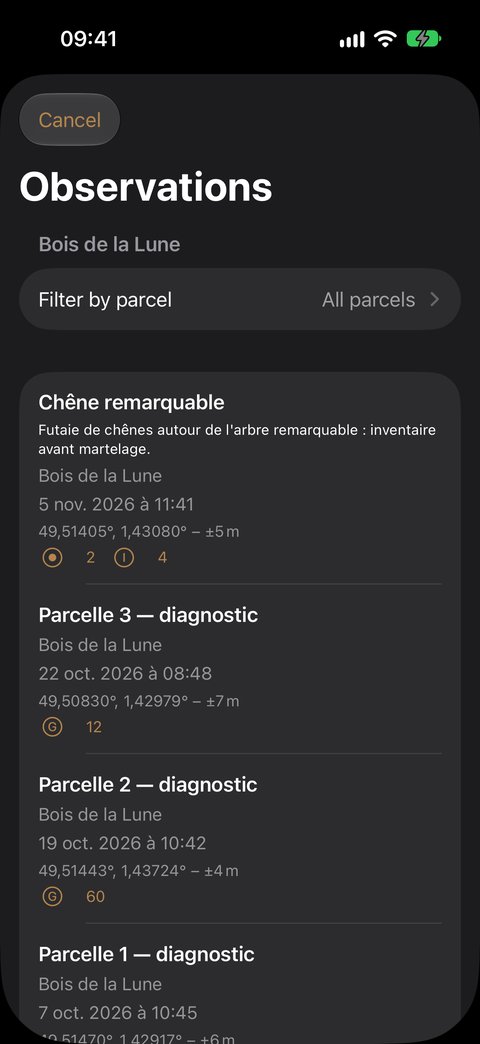
Observation history opens the list of observations of the domain in the banner. A filter, Filter by parcel, narrows the list to observations that carry at least one measurement in the chosen parcel — only those parcels are offered. Your filter is kept.
- Tap an observation: it becomes the current observation, and you return to the Observations screen.
- Swipe a row to the left: Edit (title and description) or Delete.
Deleting an observation
In Observation history, swipe the observation to the left, tap Delete, then confirm. Deletion erases all the associated items.
Deleting an observation also deletes its photographs and videos from your photo library — nothing is left behind. If the app cannot delete them (permission refused), the observation is not deleted either: you never end up with orphaned photos. The tree visits recorded in this observation are removed with it.
For photos and voice notes deleted one by one, you can turn off the confirmation request: Settings ▸ Observations ▸ Delete photos without confirmation and Settings ▸ Voice input ▸ Delete recordings without confirmation.
Frequently asked questions
How much does a day in the field cost? Only Tree and Plot use a credit, one each. Creating observations, taking photographs, dictating: free. A day following 40 trees costs 40 credits. The details: Credits.
Do I need one observation per point? No. An observation groups what you do during a round or a day, from one parcel to the next: each tree and each plot keeps its own parcel. Create a new one when you change day or topic.
Can I measure several trees in the same observation? Yes, as many as you like. Each tree has its record; remeasuring it later adds a new visit. The Tree guide explains everything.
I abandoned an entry halfway through, have I lost a credit? No: an action abandoned before being saved uses nothing. Correcting a tree visit that has already been saved is free.
Is my plot saved if I leave the screen? Yes, as soon as you tap Exit. Left too early? Resume the survey reopens the same survey, with no new credit.
I have no credit left, what happens to my work? It remains fully accessible: viewing, correcting, exporting. Only Tree and Plot are suspended; photos and voice notes remain possible. To top up: Settings ▸ General ▸ Buy credits, or the button in the "Out of credit" alert — see Credits.
Where has Pedology gone? It has been temporarily removed from data entry; your existing surveys are kept. See Pedology.