
Guides & videos
Plot
In a nutshell: a plot is measured from a single point, marked with a stake, in five gestures — timber with the relascope, coppice by quarters, poles in a 10 m circle, regeneration in three small circles on the ground, lying dead wood along three lines. This guide follows the order of the gesture bar. The five gestures form a single survey, which costs only one credit — see Credits.
The survey is started with the Plot button of an observation — see the Observations guide.
Before you set off
- Calibrate the relascope once and for all: Settings ▸ Device Configuration ▸ Relascope Configuration (Settings guide). Without calibration, the Timber counts are wrong.
- Draw your parcels: outside any parcel of the domain, the Plot button is greyed out. The parcel also serves as a memory: the species and competing vegetation you note there are offered first in the following surveys.
- Take a stake (or a marking spray can) and, if you want to check distances, a measuring tape.
- An iPhone Pro (fitted with LiDAR) draws the ruler, the transects and the regeneration circles on the ground. On another model, everything can still be measured, but distances are read with the tape or by eye.
The data entry screen
Tap Plot: the camera preview opens. The five gestures are done from the same screen.
- Choose the gesture in the top bar: Timber, Coppice, Pole, Regen or Dead wood. You move from one to another freely, in the order you like: each keeps its choices and its readings.
- Count with the shutter button (the Regen gesture has none: everything is noted there on a sheet). The banner at the bottom recalls the gesture's last reading and its total; the ↶ arrow cancels the last entry of the current gesture.
- Tap Exit: everything you have entered, all gestures together, is saved in a single survey, which costs only one credit. If you exit without having entered anything, nothing is saved and no credit is deducted.
Step 0 — The centre of the plot
- Once at the point, create the observation: it captures your position.
- Drive the stake into the centre of the plot. The whole measurement starts from it: the Timber sightings, the ruler for coppice and poles, the three regeneration circles, the three dead wood transects.
- Tap Plot: the camera preview opens on the Timber gesture.
Step 1 — Timber: the relascope sweep
What is counted: countable trees — from class PB (17.5 cm in diameter) upwards — living, condemned or standing dead, whose trunk at 1.30 m exceeds the relascope marks.
Where to stand: at the stake, without moving. You turn on the spot, that is all.
- Aim at each tree at a height of 1.30 m. If it is wider than the gap between the marks, it counts; narrower, it does not count. A borderline tree (as wide as the marks) is counted every other time.
- Choose its species (on the left), its diameter class — PB (17.5 to 27.5 cm), BM (27.5 to 47.5 cm), GB (47.5 to 67.5 cm), TGB (67.5 cm and over) — and its distance band: ≤ 10 m, 10 to 30 m or > 30 m.
- A condemned or standing dead tree? Tick it in the Sanitary panel. It is counted here, never in the Dead wood gesture, which only concerns wood on the ground.
- Press the shutter. The azimuth is recorded on its own. Carry on until you have done the full circle.
A species not yet met in the parcel? Tap Other: two buttons, Broadleaf and Conifer, open just below; choose the type, then the species in the full list — it immediately joins the parcel's species. A second tap on Other closes the two buttons. The same applies in Coppice and Pole.
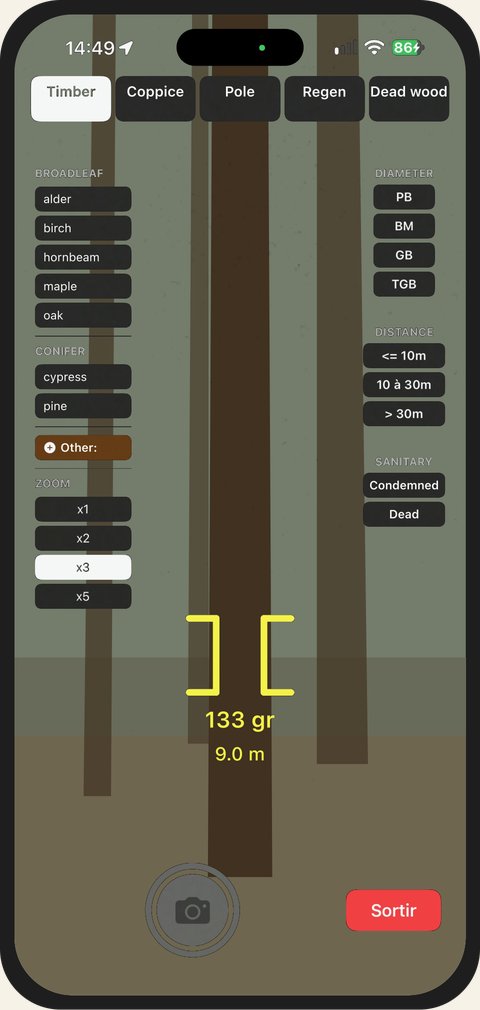
The zoom only exists in Timber: it helps you aim at distant trees. One level is always ticked when the screen opens — x1 the first time, then the one you chose last, kept from one survey to the next. The Timber sightings are also used to calculate the plot's GPS centre, saved with the survey.
Step 2 — Coppice: the four-quarter method
What is counted: in each of the four quarters of the horizon, the coppice stem nearest to the stake, within 10 m — only one per quarter, four in total.
Where to stand: at the stake.
Which stem counts as coppice? A coppice stem is a living stem whose base is less than 30 cm from a neighbour of the same species, with a diameter of 7.5 to 17.5 cm at 1.30 m. In each quarter, ignore thicker stems: they do not decide which stem is nearest.
| Stem | Gesture |
|---|---|
| Under 7.5 cm | Regen, outside basal area |
| 7.5 to 17.5 cm, neighbour of the same species within 30 cm | Coppice |
| 7.5 to 17.5 cm, isolated | Pole |
| Over 17.5 cm, even on a stool | Timber, with the relascope, with its category and health status |
The horizon is divided into fixed quarters, referenced to north: 0–100 gr, 100–200 gr, 200–300 gr, 300–400 gr (0–90°, 90–180°, 180–270°, 270–360°). You have nothing to choose: the bearing of the sighting designates the quarter.
- Place the stake in the app (first time only — iPhone Pro): aim the reticle at the foot of the stake, then tap I am at the stake. A circle marks it on the ground. This stake is then used for all gestures: Pole, Regen and Dead wood take it over.
- Aim at the nearest stem in the quarter. The ruler on the ground starts from the stake and follows your sighting, graduated every metre up to 10 m.
- Read the graduation at the foot of the stem, transfer it to the slider on the right (1 to 10 m), choose the species and the class D10 or D15, then press the shutter. An arc drawn on the ground, centred on the stake, follows the slider: when it passes the foot of the stem, the distance is right — even if the stem is not in line with the ruler.
- The Quarters panel shows the state of all four: recorded (with its distance), empty, or to do.
- No coppice within 10 m in a quarter? Tap Empty quarter. It is a legitimate value, which goes into the calculation.
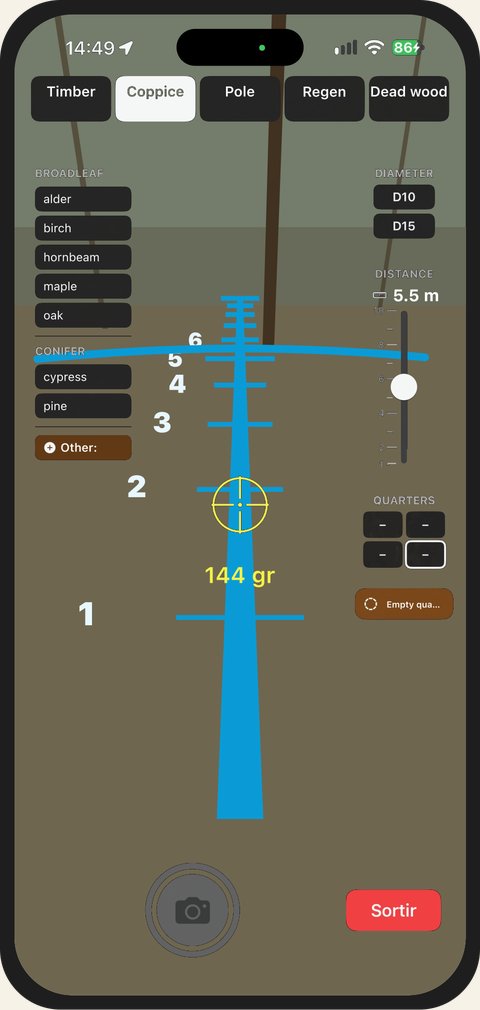
- A stem farther away than the one already recorded in the same quarter asks for confirmation: it is the nearest one that counts.
- On exit, the quarters you have not recorded are filled in as empty quarters as soon as at least one quarter has been recorded: coppice is always saved with four points.
Step 3 — Pole: the 10 m circle
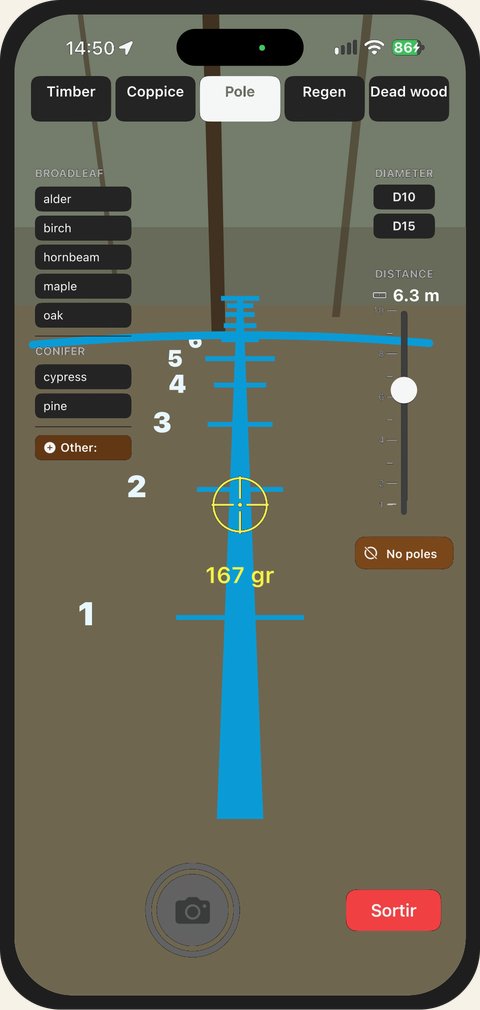
What is counted: all poles — classes D10 (7.5 to 12.5 cm) and D15 (12.5 to 17.5 cm) — located less than 10 m from the stake. One pole per press.
Where to stand: at the stake.
- Aim at each pole. The ruler on the ground shows you whether its foot is within or beyond 10 m; the slider's arc sits at its foot as in Coppice.
- Transfer the distance read to the slider (0.5 to 10 m), choose the species and the class, press the shutter.
- Do the full circle without missing any: turn slowly, in one direction.
- No poles in the circle? Tap No poles and confirm. The plot is then counted as zero in the diagnostic, instead of being ignored. A pole counted afterwards removes this mention.
Step 4 — Regen: regeneration in three circles on the ground
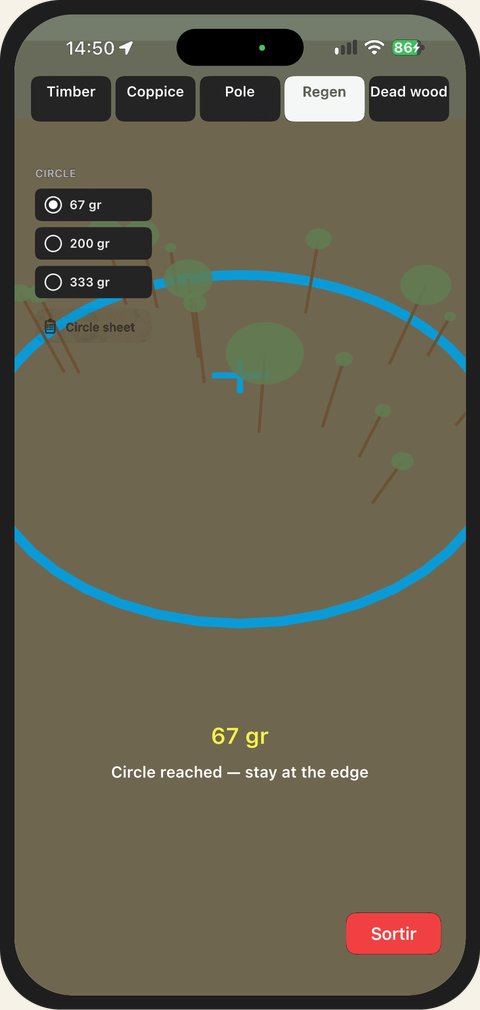
What is noted: regeneration — seedlings not from stumps, under 7.5 cm in diameter — in three circles with a 1.5 m radius, centred 5 m from the stake, at azimuths 67, 200 and 333 gr (60°, 180°, 300°). The circles fall halfway between the dead wood transects: walking the transects never tramples them. For each circle: seedlings by species and height class, browsing by game, competing vegetation.
Where to stand: at the edge of each circle, without stepping into it — so as not to trample the seedlings you are noting.
Reaching a circle
- The stake first. If it has already been placed in Coppice, Pole or Dead wood, Regen takes it over. Otherwise, aim the reticle at the foot of the stake, then tap I am at the stake.
- Choose a circle in the Circle panel, on the left. Only that circle is drawn on the ground, with a dotted path from the stake. An arrow and the distance lead you there ("Circle 67 gr in 3.8 m").
- Within 2.5 m of its centre, the phone vibrates: "Circle reached — stay at the edge". The 1.5 m ring is drawn on the ground, its centre marked. If you step into the circle, the screen reminds you: "You are inside the circle: mind the seedlings".
- Open the Circle sheet — the button below the circles, or a second tap on the chosen circle — and note what you see (below).
- Choose the next circle: guidance starts from where you are, without going back to the stake. There is nothing to "finish": changing circle is enough.
A stem counts if its foot is inside the ring drawn: you judge by eye. Heights are also estimated by eye.
The Circle panel shows the state of each one: ✓ measured, ∅ no seedlings, ⊘ not significant, nothing if not yet measured. The banner summarises the chosen circle: "Circle 67 gr · 2 species · measured ✓". In Regen, neither reticle nor shutter: only Exit remains at the bottom of the screen.
The circle sheet
When a circle is opened, its sheet is empty: no species and no vegetation are offered by default. It reads from top to bottom, in the order of what you find.
- Circle not significant — the first thing to check on arrival. The circle falls on a path, a stand edge, a stump? Choose the Reason — Path, track, Stand edge, Outside the estate, Obstacle (stump, slash, ditch) or Other (to be specified) —, then Mark as not significant… and confirm. The circle is left out of the statistics; what you had noted in it is kept. Remove “not significant” brings it back in.
- No seedlings — one tap, without confirmation: the circle has been looked at and carries no seedlings. The button is greyed out as soon as a species is noted; a second tap removes it.
- Seedlings by species — Add a species opens the list of the parcel's species, then Other species…. The species is added to this circle only and opens as a panel, with four columns:
- < 0.5 m: the cover of small seedlings over the circle — a few, 5–15%, 15–30%, > 30%;
- H1 (0.5–1.5 m), H2 (> 1.5 m, Ø < 2.5 cm), H3 (Ø 2.5–7.5 cm): the number of stems in the circle — None, 1–4, 5–10, > 10. "None" explicitly records zero; a class with no button chosen is not recorded;
- across, the species' Browsing: None, At least 1, > 50% of the seedlings affected, or NR (not recorded).
- Competing vegetation — Add vegetation opens the parcel's vegetation, then Other vegetation…: choose the group (Brambles and climbers, Ferns, Grasses and rushes, Heaths and dwarf shrubs, Low shrubs, Nitrophilous herbs), then the plant. It joins the parcel's list and will be offered to you in the following surveys in this parcel. Its panel has three columns: Cover (same bounds as the seedlings), Height (< 30 cm, 30 cm–1 m, > 1 m) and Seedlings overtopped (yes / no). Nothing is hindering the seedlings? No competing vegetation, greyed out as soon as a vegetation is noted.
- Only one panel open at a time; when closed, it summarises its choices on one line. A second tap on a chosen button removes it.
- Remove, at the bottom of an open panel, takes the species or the plant out of the circle. A species added without any choice disappears when it is closed.
- The sheet is closed with Close, with nothing to confirm: each choice is saved when you tap and is undone with ↶.
- A circle with no seedlings keeps its sheet: note the competing vegetation there anyway — it is often what explains the absence of seedlings.
- "Locating — sweep the ground slowly": the iPhone is working out where it is in space; the circle appears after a few seconds. The sheet remains accessible.
- "Guidance unavailable: place the circle with the compass, 5 m from the stake at 67 gr": your iPhone does not support guidance. Locate the centre with the measuring tape and the compass; the sheet works in the same way.
Step 5 — Dead wood: lying wood, along three transects
What is counted: each piece of lying dead wood that crosses one of the three lines, by diameter class at the crossing point: D10, D15, D20, D30, D50, >D50.
Where to stand: walking along each 20 m line, starting from the stake, at azimuths 0, 133 and 267 gr (0°, 120°, 240°).
- Choose the transect in the left-hand panel. An arrow points you towards its direction.
- At the stake, tap I'm at the stake — start. The line appears on the ground, graduated every metre, with a marker at 20 m. If the stake has already been placed in another gesture, the app first brings you back to it; if you seem too far from the stake, it asks for confirmation before starting. The check line shows how far the GPS places you from the centre of your Timber sightings — in orange beyond 10 m: check your stake.
- Walk on the line: an arrow keeps you on it (Walk forward, Turn, Rejoin the line, Turn around) and the distance walked is shown. The portion already walked turns white.
- At each piece that crosses the line, choose its class — measured at the crossing, not at the thick end — and press the shutter. Its distance along the line is recorded; the panel counts your pieces per section (0–10 m and 10–20 m). A piece counted outside the 20 m asks for confirmation.
- At 20 m, the phone vibrates. Return to the stake before the next transect: this return resets the guidance.
- No pieces on a transect? Tap Empty transect and confirm: it counts as a zero volume.
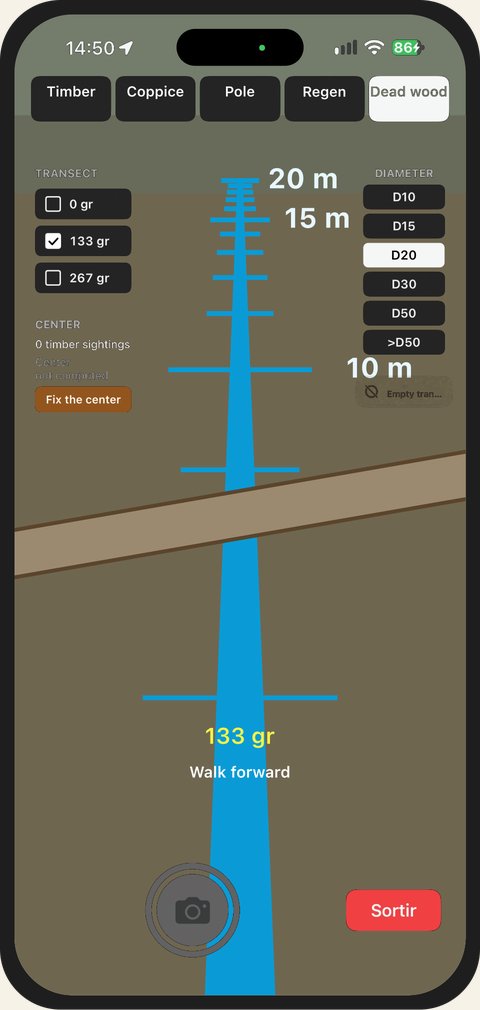
- A piece that crosses the line twice (curved branch) is counted twice. A piece that only touches the line without crossing it is not counted.
- The transect visibly deviates from a known landmark? Correct the direction (−1° / +1°) rotates the three lines — and the regeneration circles with them; the correction is saved.
- "Locating — sweep the ground slowly": the iPhone is working out where it is in space. Sweep the ground for a few seconds; you can count in the meantime, without distance.
- "Calibrate the compass (draw a figure 8)": the bearing is inaccurate and the line is shown dotted. Draw a figure 8 with the phone.
- "Guidance unavailable: count by following your compass": your iPhone does not support guidance. Counting works, following the direction with the compass.
On exit: the parcel of the measurement
Tap Exit: the five gestures are saved in a single survey, placed on the map at the centre of the plot and filed in the parcel where this centre lies.
The centre sometimes falls in a neighbouring parcel of the one where you started the entry — a plot placed near a boundary. The app tells you so (Parcel of the measurement) and lets you choose: Count in the parcel of the centre, or Count in the parcel where you started. Your choice is kept.
The plot summary
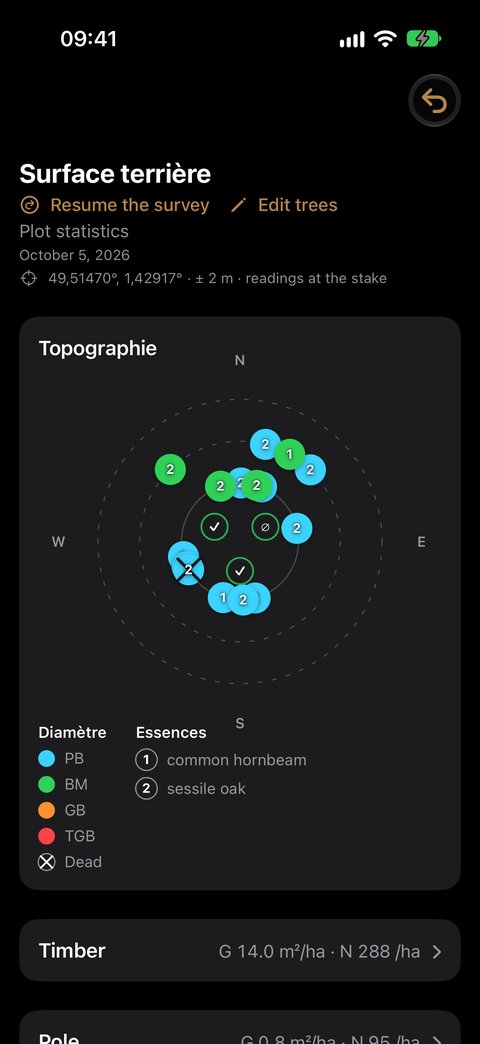
The summary is shown on exit, and later from the observation's detail. At the top, always visible, the topographic diagram: timber, poles and coppice placed around the stake by azimuth and distance — one colour per diameter class, one number per species —, and the three regeneration circles with their state (✓ ∅ ⊘).
Then comes one section per gesture carried out — Timber, Pole, Coppice, Regeneration, Dead wood —, then the Species section. All are closed when the summary opens: their header shows a key figure, and a tap opens or closes them.
| Section | Collapsed header | When opened |
|---|---|---|
| Timber | G (m²/ha) · N (stems/ha) of living trees | basal area and number of stems by class and by species; separately, condemned and standing dead trees; cross tables with the Percentages toggle |
| Pole | G · N | number of stems and basal area per hectare, by class and by species |
| Coppice | G · N | density and basal area by the four-quarter method; the table of the four quarters |
| Regeneration | density and circles used, for example "2,830 stems/ha · 2 / 3 circles", or "No seedlings · 3 / 3 circles" | density by species and by height class; by species, frequency, cover, score and browsing; the competing vegetation; the excluded circles and their reason |
| Dead wood | V of total dead wood (m³/ha) | Total dead wood = standing dead + lying, then the details; condemned wood separately, in italics, never added; tables with the % Volume / Count toggle |
| Species | the majority species and its share | one row per species entered — grouped by genus as soon as two species of the same genus appear, the species indented —, with their basal area in timber, coppice and pole, and a Total row |
A ⚠ on a header flags a mention to read in the section:
- Timber: a stem in an impossible cell (PB or BM beyond 30 m) — check the class or the distance;
- Coppice: Truncated plot — one to three empty quarters, density and basal area corrected accordingly —, or Incomplete stems — a stem without a diameter or without a distance;
- Regeneration: a not significant circle, excluded from the calculation.
The statistics of your plots can be found, parcel by parcel, in the Analysis guide.
Resume the survey
You exited too early — a coppice quarter forgotten, a regeneration circle not yet done? Resume the survey, in the summary or from the observation's detail, reopens the same survey, with the same stake and what you had already entered. Complete it, then Exit: the survey is updated with no new credit.
Correcting a survey
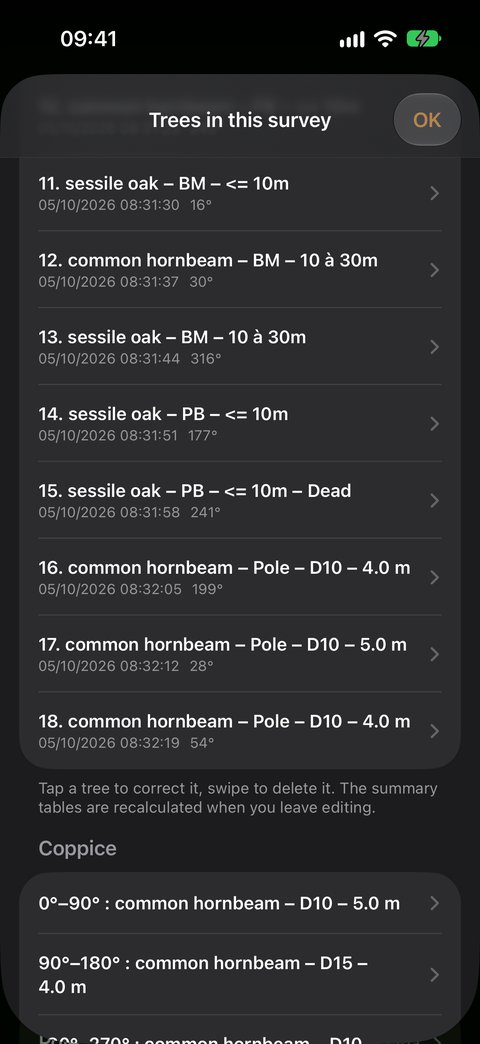
A data entry error can be corrected afterwards, in the field as well as at the office. In the summary — on exit, or later from the observation's detail —, Edit trees opens the survey's list: the trees, timber and poles, a Coppice section with the recorded quarters, and a Regeneration section with the three circles.
- Correct a tree: tap it — species, stage, diameter class, health status, band or distance.
- Correct a coppice point: tap it — species, class D10 / D15, distance from 1 to 10 m.
- Correct a regeneration circle: tap it — its sheet reopens as you left it, and everything can be corrected there: no seedlings, classes, cover, browsing, competing vegetation, not significant.
- Delete: swipe the row to the left. A tree disappears from the survey; a coppice point leaves its quarter empty — the coppice keeps its four quarters, and its density is recalculated as for a plot with an empty quarter.
- The quarter, the azimuth, the time and the position are field measurements: they cannot be changed.
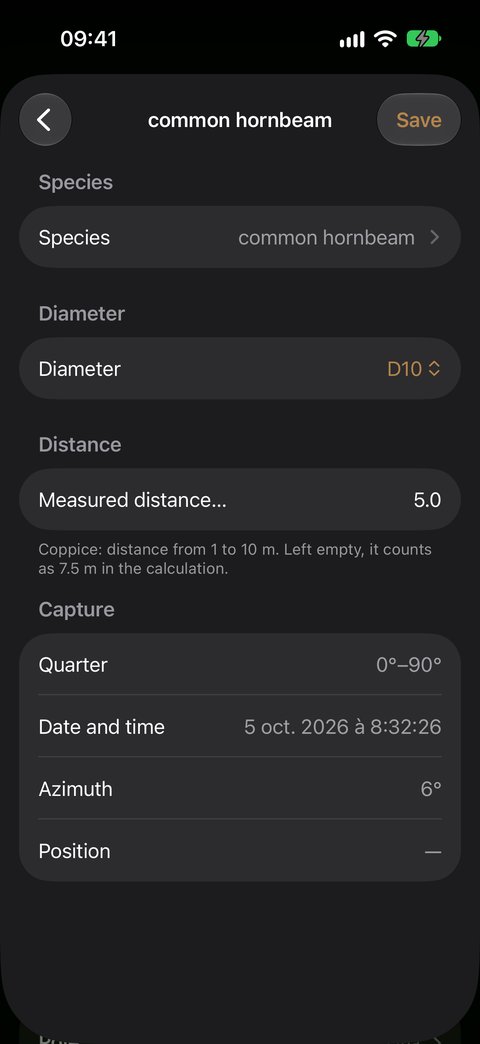
Changing species. The list first offers the species already met in the parcel, broadleaves then conifers, the current species ticked; the type follows the chosen species. A new species? Other species…, then Broadleaf or Conifer, opens the full list, and the chosen species joins those of the parcel.
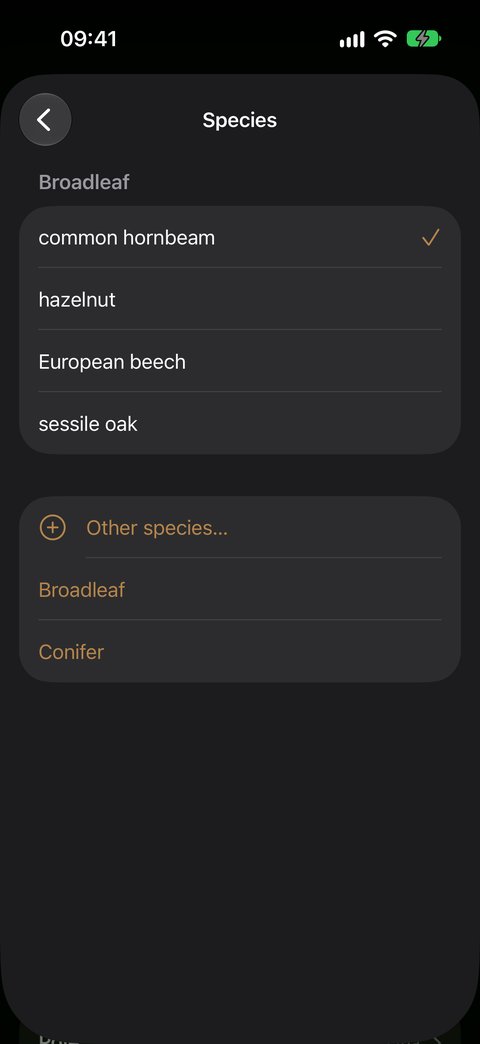
When you close the list, statistics, tables and diagram are recalculated. A correction uses no credit. To correct many rows at once, or a GPS position, use the spreadsheet: see Excel › Import.
In summary
| Gesture | Where | What | Distance |
|---|---|---|---|
| 0 — Centre | — | drive in the stake | — |
| 1 — Timber | at the stake, without moving | trees ≥ PB that exceed the marks | band chosen |
| 2 — Coppice | at the stake | the nearest stem in each quarter | ruler on the ground → slider |
| 3 — Pole | at the stake | all poles within 10 m | ruler on the ground → slider |
| 4 — Regen | at the edge of three 1.5 m circles, 5 m from the stake | seedlings by species and height, browsing, competing vegetation | guidance to the circle |
| 5 — Dead wood | on three 20 m lines | the lying pieces that cross the line | along the line |
One survey, five gestures, one credit — resuming and corrections are free.
What next
- Back to observations — the other ways to enrich an observation
- The diagnostic of your plots — parcel by parcel
- Credits — what a credit counts, and how to buy more